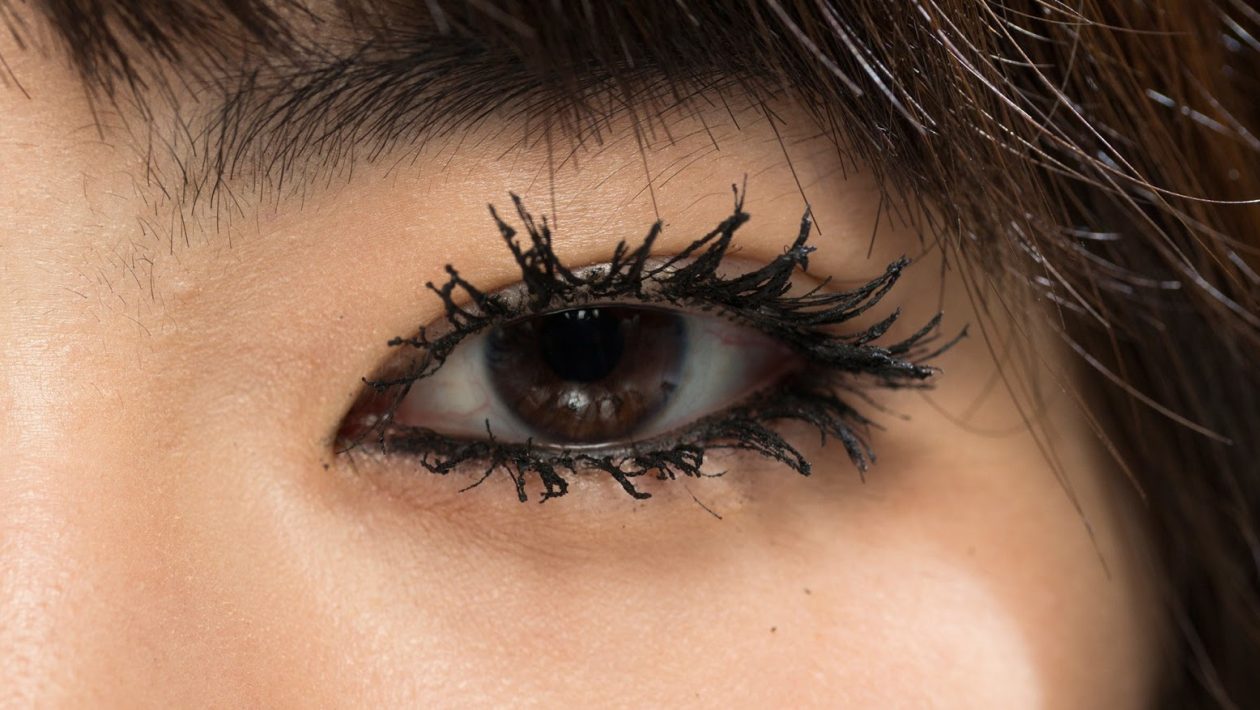
While some people consider the spider-lash look a bit of a rebellious fashion statement and do this on purpose (and if this is your thing—grab your mascara and go for it! ), for most of us the spider-lash look is not the look we are going for when we try to lengthen and volumize our eyelashes with mascara. And while long, sticky mascara lashes did help one famous woman make a name for herself many years ago (Anyone old enough to remember Tammy Faye Bakker? If not—take a quick Google break here.) for most of us, this look won’t skyrocket us to fame anywhere except behind the smirks at the water cooler.
So what are some tips to avoid having eyelashes like tarantula legs, when all we really want is to get some length, volume, and darkening out of a great drugstore mascara?
Grab Your Glasses!
This should be a no-brainer, but so be it. Judging by the fact that I see spider-lashes on many otherwise beautiful older women—who clearly don’t intend this as a hipster fashion statement—I think it has to be said. If you need glasses to read, you need glasses to check your mascara results!
While obviously, it’s impossible to apply mascara while wearing your reading glasses, you should always put them on immediately after application while there’s still time to remove any excess or swipe off clumps. Put on your glasses and take a peep at your peepers. If you’ve never done this before, you’ll be shocked at how different what you thought your mascara looked like than what it actually does. (I know, I’ve tried it.) And you have to remember that just because you can’t see these small details with your far-sighted eyes, doesn’t mean that other people are seeing the same way. In other words, while you might have left the house thinking your eyelashes look like Kim Kardashian’s, to people with 20/20 vision you look like Tammy Faye Bakker. (Again—Google, if you haven’t already.)
Do The Wipe and Swipe
Before applying your mascara, lightly brush the wand on a piece of tissue and wipe off the excess. Some mascaras—particularly volumizing brands—have wider openings at the top of the tube to allow more product onto the wand brush. Removing excess mascara is probably the most important tip to prevent clumping and spidery lashes.
If you resist wiping before swiping because the frugal part of your nature doesn’t want to waste any of the product you spent good money for, here is another unfortunate truth. Mascara expires after three months, and there is always going to be leftover product in your tube at the end of that time period. So wiping away the extra mascara isn’t going to break your budget, but a trip to the hospital for an infection from old mascara might. This brings us to the next tip.
Check it and Then Chuck it
Check the expiration date on your mascara if you can find one. Some mascara brands will have an expiration date printed on the tube, but many do not since the FDA doesn’t require it. For most of us though, we should at least have a vague recollection of when we purchased our last mascara, and if we don’t, then it’s been too long and it needs to be tossed.
Mascara that has aged beyond its expiration date dries out and this causes the product to be thick and clumpy, rather than applying in the smooth silky way that it was intended.
You can also prevent excess air from drying out your mascara before its time by resisting the urge to pump the wand in and out of the tube. This allows air to get inside the tube and compromise your mascara’s quality. Instead, swirl the wand inside the tube before removing it.
Formula Faux Pas
Another mistake that could be causing a spider-lash look is the formula of the mascara you are using. While lengthening mascaras are typical of a thin, silky consistency that separates and lengthens each lash, volumizing mascara is thicker and is intended to really coat each lash with a lot of product. If your lashes are already fairly thick and it’s length or darkening that you are looking for, using a volumizing mascara will add more product to your lashes than you need and may result in a sticky, clumped appearance.
Zero in on the Zig-Zag
If you’ve been simply swiping your mascara from the base of your lashes to the tips, you’ve been doing it wrong. Makeup artists have long known that the best way to apply mascara is to start at the base of the eyelashes and then use a zig-zag motion while you swipe upwards to the tips. This allows each eyelash to settle into the spaces between the bristle rows so each lash is separated and evenly coated with mascara, giving you longer, lusher, lashes without clumps.
The Brush-Off
It’s also important to pay attention to the type of brush on your mascara wand. Thicker brushes will add a lot of product all at once and are much more likely to leave clumps. Thinner brush heads add less product and spread it more evenly for less clumping.
Many people don’t realize that not only is the size of the brush important, but the tip of the brush is also an important part of the mascara wand. It can be used to separate stuck-together eyelashes and to target lashes that you want especially long, like the ones on the outer edge of the eyelid without over-coating the rest of the eyelashes in the process.
Don’t go Big on the Bottom
Keep in mind that the bottom lashline has smaller eyelashes than the top for a reason. And while we may not know or care what that reason is, we do instinctively recoil when we see that someone has overdone their bottom eyelashes. If spidery lashes look unnatural on top, then they look really wrong on the bottom.
Instead of swiping mascara from root to tip on the bottom lashes, place the wand brush on your lower lashes and then zig-zag horizontally ONE time. This thickens and darkens the lower lashes without adding unnatural length.
Avoid the Over-Coat
Mascara is formulated to look its best with only two coats. Apply your first coat and then quickly apply a second coat before the first one dries. Applying extra coats should be done with great care, if at all. Mascara is formulated to stick to the natural texture of human eyelashes. It doesn’t adhere correctly to eyelashes that are already covered in product and the results can be clumpy spider-lashes.
Use these tips to avoid accidentally sporting spider eyes when you really only wanted your lashes to look lush and natural. However, if spider-lashes are your ideal look, simply reverse these directions and go for it!