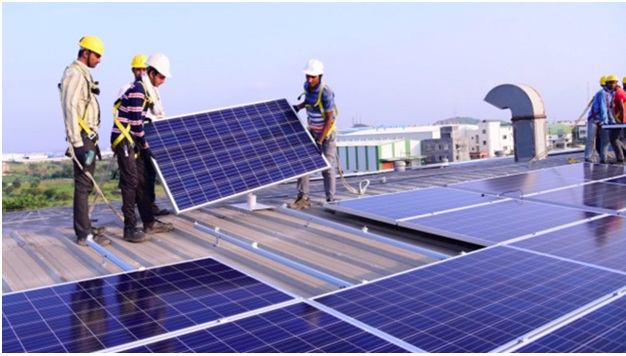
Solar panel installation is a task left best to the solar experts. But we still recommend that if you are planning to get a solar panel installed on your property, you must have a basic understanding of the entire process. Therefore, to help you with the same, we have listed the seven important steps to install a solar panel system at home.
Come, let’s dig deeper.
Step 1 – Installing Solar Panels on the Roof
When installing solar panels you need to ensure the following.
1. There’s enough roof space.
Once you have determined your power consumption, you need to find out how many solar panels you would need to generate the required power. Also, you need to ensure if you have enough space on your roof to install those panels. Let’s see how much roof space is required for producing 1KW of energy.
The thumb rule says
For 1 KW of power you would require 3 Solar Panels of 330W each.
And for 3 panels of 330W you would require 100 square feet of roof space.
This means a home with 1 KW power requirement requires 100 square feet of roof space.
A typical Indian household requires 3KW to 5KW of power which means they would require around 300 to 500 square feet of roof space.
2. The solar panels receive maximum sunlight.
Okay now if you have enough roof space, we need to optimize the solar panels for maximum sunlight. There are three main factors that impact the amount of sunlight a solar panel receives.
(i) Shading
For your solar panels to get maximum sunlight, there should be minimal shading issues on your roof. Usually, shading is caused by surrounding trees and buildings that block the sunlight from reaching the solar panels. If you are facing such an issue, get your solar panels installed on an elevated structure. This will help you minimize the issue of shading to a great extent.
(ii) Direction of solar panels
For solar panels to receive maximum sunlight, the direction in which solar panels are installed is a critical factor. Since India lies in the Northern hemisphere, it’s best to install solar panels in the south direction. You can use a compass to find out which side of your house is facing the south direction.
(iii) Tilt Angle (Angle of the panel)
Tilt Angie is the angle between the roof and the solar panel. It is one of the most important factors that need to be considered when installing a solar panel. That’s because if you need maximum output from your solar panels you need to ensure the right tilt angle. (Provigil)
However, the right tilt angle varies from location to location. In India, the right tilt angle varies from 15 degrees to 40 degrees. For example – Those living in Jammu and Kashmir need to install their solar panels at 35 degrees. Similarly, for those living in Telangana, the tilt angle is 12 to 18 degrees.
Here’s an on-screen easy reference map by Luminous that you can refer to if you want to find out the right tilt angle range for your location.
Zone 1 – J&K, Punjab, Himachal Pradesh, Uttarakhand – 30-35 degrees
Zone 2 – UP, Rajasthan, Bihar, Delhi, Haryana, North Eastern States – 24-30 degrees
Zone 3 – Gujarat, MP, Jharkhand, WB, Maharashtra, Chhattisgarh, Orissa – 18-24 degrees
Zone 4 – Karnataka, Tamil Nadu, Andhra Pradesh, Telangana, Kerala – 12-18 degrees
Step 2 – Ensuring all the necessary electrical connections
Once the solar panels are installed the next step is to make the necessary electrical connections. You need to start with connecting the junction box wires (at the backside of the solar panel) to the other solar panels’ junction box wires.
The junction box has two wires coming out of it. A positive wire (male connector) and the negative wire (female connector)
To make a parallel connection the positive wires coming out from all the junction boxes of all the solar panels are connected to the MC43F1M connector. Similarly the negative wires from all solar panels should be connected to the MC43M1F connector.
Once the connection is done, the next step is to install an MCB box on a wall. A 40 ampere double pole DC MCB is then installed on this MCB box.
Note – Make sure the MCB is turned off.
The MCB box has two sides, the input side and the output side.
The positive and negative wires coming from the MC4 connector go into the DC MCB input side.
Step 3 – Connecting the MCB to your solar inverter
Now we need to connect the MCB Box to the solar inverter. For this, we need to connect 2 output wires to the MCB’s output side.
A 10 square mm red wire is connected to the positive terminal output side of the DC MCB. Similarly a 10 square mm black wire is connected to the negative terminal output side of the DC MCB.
These wires are then connected to the solar inverter.
The red wire coming from the positive terminal output side of the DC MCB goes into the positive terminal of the solar inverter.
Similarly, the black wire coming from the negative terminal output side of the DC MCB goes into the negative terminal of the solar inverter.
Step 3 is now complete.
Step 4 – Connecting the battery to your solar inverter
Before you connect the batteries to the inverter, you should connect the batteries to each other (in series) using a battery jointer.
Connect one end of the battery jointer to the positive terminal of battery 1.
Connect the other end of the battery jointer to the negative terminal of battery 2.
Now connect the wire coming out of the positive output terminal of the solar inverter to the positive terminal of battery 2.
Similarly, the wire coming out of the negative output terminal of the solar inverter should be connected to the negative terminal of battery 1.
Step 5 – Connecting Inverter Mains to the AC MCB
Once step 4 is complete it’s time to make the Mains connection. For this, the output wire from the solar inverter goes into the AC MCB (also known as the home MCB).
Step 6 – Connecting AC Output to MCB Box
After the mains connection is complete, the AC output socket needs to be connected to the MCB Box.
Step 7 – Switch on the UPS and the DC MCB
The final step is to switch on the Inverter and the DC MCB.
Your solar panel system is now installed
If you have any questions about solar panel systems, we recommend that you talk to one of the experts at Luminous India, one of India’s most trustworthy and reputable brands in the solar panel installation industry.


